top of page

RRinaBOXer of the Month

Michael W., Fairfax  VA

Horned Owl QuickieLine Kit     N Scale

Magazine 3 p3.jpg
Bulletin board note classic toy trains.p

Click Here to

see our new 

Press Page

Introducing QuickieLine Kits!

®

Build a model train layout in 5 easy steps:

  1. Add glue to base

  2. Add ribs and profiles to base

  3. Add horizontals on ribs

  4. Add track, trains and scenery to horizontals

  5. Have Fun


QuickieLine Kits—the world’s first kit that builds a whole layout!


NO trips to the hardware store for 2x4’s or plywood!

NO power tools!

YES—with the RRinaBOX  QuickieLine Kits modelers just add glue!

We're sure this young fellow did not know when his father brought him to the World's Greatest Hobby Train Show in Chantilly VA , February 2020, that he would be building a train layout.  But this video shows he did just that. The pre-cut, labeled pieces are easy and fast to assemble.  The top pieces (pre-painted and with track piece designations) give you a head start in creating your very own world.

JUST ADD GLUE

Designed by Alley Friends Architects of Philadelphia PA, The RRinaBOX  QuickieLine Kits contain precision cut, clearly identified pieces of foamboard which builds a structure—the benchwork for a toy train layout.  An illustrated handbook, and 60 minute video takes the modeler from gluing the structure together to laying and wiring track, running trains, adding buildings and creating scenery.

The QuickieLine Kit-- when assembled using Elmer’s glue-- allows for two train operation with cross-over, and comes with four bridges, a viaduct, two mountains with tunnels and a waterfall.

Originally created to get kids and novices into the hobby, we have found that experienced modelers  appreciate the advantages the QuickieLine Kits offer. 

The internal ribs and profiles create the benchwork for strength and structure.  The top pieces (horizontals) are pre-cut to allow for grade changes and are glued to the tops of the ribs.  The finished layout will have four levels for your trains to traverse.


The horizontal pieces are in color and show a town area with streets, sidewalks, and a park.  A river with a dock, a secluded beach and a waterfall are included in the QuickieLine Kits.  Also, there is designation for specific track in the green, grassy areas.  For those who are intimidated by scenery don’t be—the QuickieLine Kits give you a head start.  Many customers simply add track and trains and a few buildings to the painted horizontals and have a finished layout.  Remember, the foamboard horizontals make it easy to “plant trees”—a ball point pen to make the hole and some Elmer’s glue is all you need. 

Bob Keller of Classic Toy Trains Magazine saw the QuickieLine Kits at the York TCA Train Show in York PA a few years ago and after we explained the steps of building the kits to him, he smiled and said--- “just add glue”.  Thanks Bob.

®

®

®

®

MODULAR, FOAMBOARD CONSTRUCTION

NO 2x4’S, NO PLYWOOD, NO WOOD SHOP NEEDED

Since 2003, hundreds of toy train layouts have been built using the original RRinaBOX  Full-Size Patterns laminated to foamboard.  Since then, foamboard has been touted by many professional modelers as the best material for layout building due to its strength, durability, flexibility, lightweight and ease of use.

The internal rib structure has pre-cut slits where they cross and when glued together can hold the heaviest trains.  Foamboard is easily cut on the top, and holes are easily made in the ribs to allow wiring of your track and buildings to reach the power source.

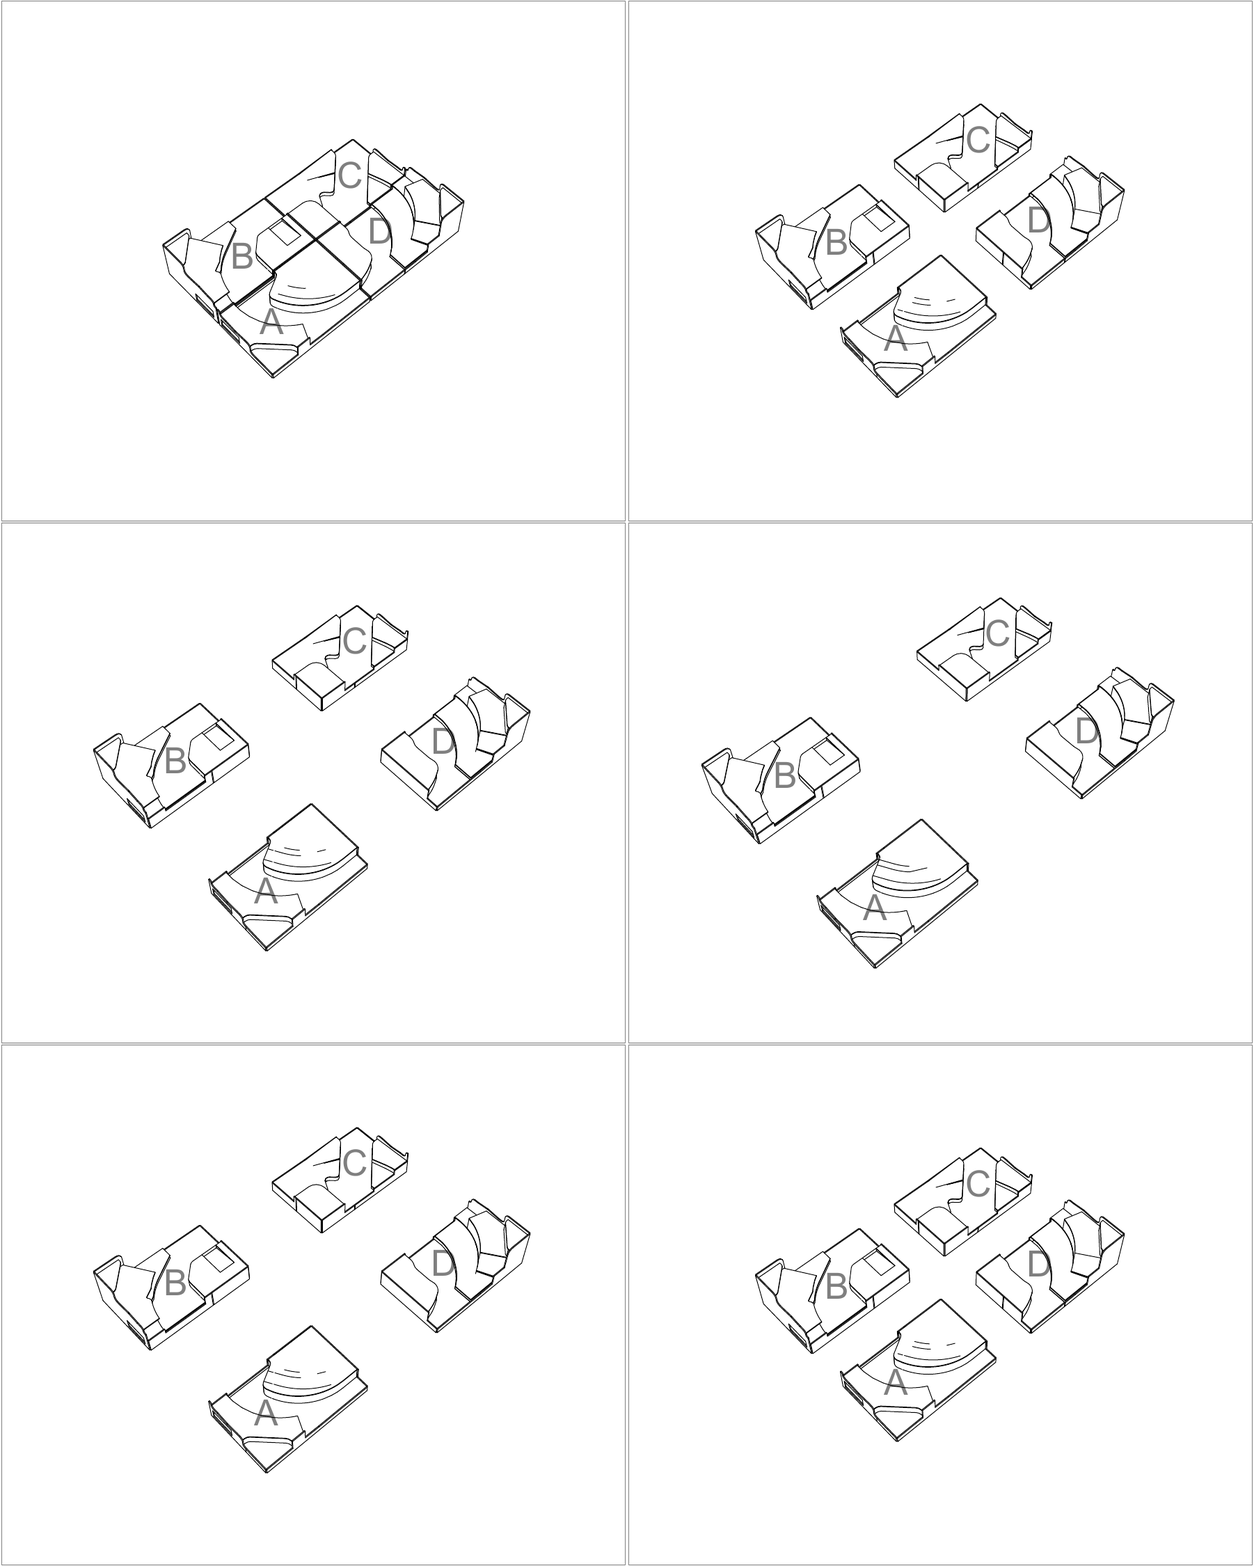
RRinaBOX  gets its name from the fact that the modules A & B fold on top of modules C & D to “nest”, or form a box, for easy storage or transport.  Most RRinaBOX  QuickieLine Kit layouts weigh only about 25 pounds!

One kit builds four modules which are then bolted together to make your layout.  Bolts with nuts and washers are included as well as pre-cut bolt holes in the profiles!  But there is more-- access panels in the bases make it easy to bolt them together! We thought of everything—everything to make model railroading easy and fun for all!

Because of the modular foamboard construction, all kits expand both in length and width. See products page for dimensions.  Expansion modules can be included in the original construction or added later without changing original track design.

Modules are compact and can be built on a small table—in the kitchen, dining room, or anywhere you want.  One customer built a module in his den while watching the Eagles win the Superbowl. Fly, Eagles, Fly!


RRinaBOX  --the future of model railroading is HERE—get on board and order your QuickieLine Kit TODAY!

®

IMG_20151006_154815894_HDR.jpg

The detailed, illustrated instruction book provides 8 track plans. Track radii, grades and change in levels are all pre-determined from the pre-cut pieces. Customers will have access to a 60+ minute instructional video.

So, Moms and Dads, Grandmas and Grandpas, grab the kids, put down the video games and cell phones, and together build a model train layout you will all be proud of!


--NO trips to the hardware store--

--NO trips to the lumberyard for 2x4's or plywood--

--NO power tools--


YES! RRinaBOX  QuickieLine Kit modelers

JUST ADD GLUE!

®

IMG_20160105_112502449_HDR.jpg

Basic Kit

101 LAYOUT.jpg

The Basic Kit for both the Horned Owl (small trains) and the Long-Eared Owl (larger trains), contains bases, ribs, profiles, horizontals and verticals to build 4 modules.

1. Each module has a base to which the ribs and profiles are glued.  Horizontals are glued to the tops of the ribs, verticals to the sides.

Basic Kit.jpg

2. This drawing shows the 4 modules, “A”, “B”, “C” and “D”.  Modules are built one at a time to cut down on workspace.

3. The 4 completed modules, when bolted together, form the “basic structure” that is 5’5”x3’5” in the Horned Owl and 6’x4’ in the Long-Eared Owl.

FOLDING.  The “D” module (when flipped upside down) nests on top of the “A” module, and “C” nests on top of “B” for easy storage and transport.  

Expansion Modules

The Expansion Modules for both the Horned Owl and the Long-Eared Owl, contains bases, ribs, profiles, horizontals and verticals to build 2 modules.


Contact us for more information about the expansion modules.

1. Each module has a base to which the ribs and profiles are glued.  Horizontals are glued to the tops of the ribs, verticals to the sides.

2. The expansion kits contain 2 modules, E and F which are bolted together. 

3. The E and F modules are inserted between the A B C D modules of the basic kit. 

4. The Horned Owl Kit expands to 8 feet with the E and F modules. The Long Eared Owl expands to 8 feet 6 inches with the expansion kit. Multiple expansion modules can be added. 

RRinaBOX  layout features:

Precision cut components

Internal ribs and profiles for benchwork

Clearly identified ribs and profiles

2 train operation w/ interconnection

4 levels 

2 mountains w/ tunnels

4 bridges and a viaduct

Stream and waterfall

River w/ dock area

Horizontal surfaces are printed in color outlining a town, sidewalks and a park

Track locations are noted

Track radii and grades

8 track plans including “Trainset Special”, “Point to Point”, “MaxTracks” and Holiday Delight

Illustrated handbook

Video showing complete construction building/scenery

Profiles have professional looking geometry

A, B, C, D modules can be folded into a box for easy storage

Entire layout weighs 25 lbs. (light weight)

Kid friendly

Elmer glue

Quiet

®

Kit Contents

PART            


Bases                                

Profiles                            

Ribs                                 

Horizontals                      

Verticals                           

2 Mountains                       

5 Bridges:                         

        1 Viaduct

        2 Trestles

        1 Girder

        1 Truss

Bolt assemblies:                   

        1 bolt

        1 nut

        2 washers

3/16 x 3/16 Balsa                

Instruction book                    

1.5 hour video instruction     

Scenery seam tape               

 NUMBER OF PIECES

4

16

15

13

14

8

34


8


16

1

1

5

HAPPY MODELING!

bottom of page